Tuesday, May 4, 2010

Making Memories...

As my semi-annual trip to Australia approaches, I find myself daydreaming about the public market in Melbourne – second only to seeing family, it is a huge highlight during my visits.


My son, who lives on the outskirts of Melbourne with his wife and two children, makes up a menu each week and then makes his shopping lists accordingly (don't you just love lists?) ... Then every Saturday morning he heads out for the markets ritualistically. Yes, market's' - plural. He goes to the Melbourne public market for his fresh goods and meats. He goes to the “grocer” to pick-up any nonperishables, to the bottle shop for wine, and lastly to any little specialty shop(s) as needed (there are some amazing Asian Specialty stores I could spend hours in – mostly because it takes hours to figure out what everything is!) Its three-stop shopping with him on the weekends and I LOVE it!


It’s impossible to share the amazing smells and sounds (vendors trying to out-bark each other, customers bartering) or the joy I feel when stumbling upon remarkable items such as sweet potato (kumara) the size of a swaddled newborn, or bundles of fresh lemon grass so ornate you just want to put them in a vase at the center of your table. The produce is so abundant and beautiful, I end up supplementing my son’s lists and over-buying every time.


I’m not a big meat eater, so I am surprised at how impressive the meat section of this market is to me. It’s like I’ve never seen meat 'in color' before, almost as if our meat here in the US comes only in shades of gray. I really don’t need to know what you do with a sheep head, a whole goat, or pork trottle, but I am fascinated nonetheless. As I stop to photograph these anomalies, people are slightly irritated but accommodating.

  
Counting down the days - There will be shopping - There will be cooking - There will be eating - There will be memories in the making . . . Sweet, sweet memories . . .


"If you reject the food, ignore the customs, fear the religion and avoid the people, you might better stay home.
You are like a pebble thrown into water; you become wet on the surface, but are never part of the water."
~ James Michener


Thursday, April 29, 2010

Food Odors – The Good, the Bad and the Outrageous…

Meet Mick. He is my youngest “son” (the other two are human). He is a 6-year old boxer and he is always on odor patrol. If there are lingering kitchen smells, he prances around – nostrils flared and makes sure I deal with the problem.


Odors are a part of food…they lure us in and they also repel us. Some smells, such as garlic and onion, are wonderful when permeating through the air – but on your breath – well, they’re not so wonderful. I recently purchased a new Asian marinade to try with my stir-fry the other night. The second I opened the bottle and got a whiff of it, I reeled - it smelled exactly like the breath of a gal that used to do my facials…it kind of grossed me out.

But let’s start with the Good smells…like bread or cookies baking. Did you know that if you are selling your house and have cookies baking in the oven while prospective buyers are checking your place out, they will have a more favorable reaction to your home?

I don’t know about you, but the first thing I notice when entering someone’s home is the smell. Baking cookies during an open house is a wise way to go – totally over-powers other household odors and makes you feel all warm and fuzzy - homey – welcome. All things you want people to feel when you’re trying to sell your home!

Okay, let’s say your house isn’t on the market - you have guests dropping by and you don’t plan on baking – but you have been and the remnants may still be in the air. An easy trick is to quarter up an apple and throw it into a saucepan full of water, along with a stick of cinnamon and a few whole cloves. Bring it to a simmer and leave it on a low flame. The whole house will smell like fresh baked apple pie! Just be sure to keep an eye on the water so it doesn’t evaporate all the way – or you’ll have the fire department dropping in next. (Not always a bad thing; have you seen the LA Fire Fighters? Yummy!)

Now getting back to the bad odors food can leave on your breath. There are some natural remedies that are available even if you are out to dinner at a restaurant! Chewing fresh herbs works wonders at ridding bad breath, especially from eating garlic or onions. Parsley isn’t just a garnish! If you chew some and swallow a bit, it will continue to help your breath for quite some time. Since parsley is high in chlorophyll, it also helps with digestion. Other herbs that help neutralize bad breath are basil, mint, rosemary and thyme. I’ve also been told sucking a lemon that has been sprinkled with salt works as well, although I’ve not tried that method…just lime and salt…but that was just to kill the taste of the tequila shots.

Bad odors don’t just happen to good people – they also happen to good cooks! And like heat, odors tend to rise. Nothing worse than crawling into your fresh linen sheets only to have the smell of pork lingering overhead. It kind of goes without saying that whenever you are searing meat, frying with oil, or cooking with seafood, it’s a good idea to open a window or two and turn on a ceiling fan to quickly get the smells shifted outdoors. But people often overlook the bits that creep upstairs…so do the same on your upper level and crack a window, turn on a fan – you will be glad you did come bedtime. For especially difficult lingering odors, put on a large kettle of water to boil (like you were making spaghetti)…toss in a few halved lemons, squeezing the juice into the water and tossing in the rinds as well as a few whole cloves (the spice - not garlic!) or some nutmeg – keep it on the boil until the essential oils have absorbed all of the fishy and/or oily odors in the air and your kitchen will smell fresh before you know it.


Now what about getting the smell of onion or garlic off your hands? The best solution I have found is to rub your hands on stainless steel. Sounds like magic – works like magic too. I have a piece of stainless steel the size of a well used bar of soap that is made especially for this purpose. If you don’t have this little luxury item, rub your hands on anything stainless steel – your knife sharpening rod is good – a knife would be good too … but watch out for the blade. What good are odorless hands if they are bloody?


Let’s see, we’ve covered good smells, bad smells – that leaves the outrageous. I have to mention this, although it is rather disgusting, but it is such an amazing freak-of-nature phenomenon – it must be shared. A loved one (who, like all others with supernatural powers, shall remain anonymous) can emit this one fart that smells so much like an egg salad sandwich, you have to experience it to understand what I am about to say… We were visiting with an ex-college roommate a couple years ago and somehow the topic of this “egg-salad” fart came up. The ex-roomie sheepishly admitted that weirdly enough, upon smelling one – they would actually start craving an egg-salad sandwich! I about fell off my chair – because it is so true! (Now THAT’S the really disgusting part). Inspiring egg salad sandwiches without uttering a word...it's a gift I tell you!!!

“Life expectancy would grow by leaps and bounds if green vegetables smelled as good as bacon.” Doug Larson


Wednesday, April 28, 2010

Bruschetta Sandwich

4 sandwich thins, Costco*
4 ounces fresh mozzarella, roughly chopped
1/4 cup fresh basil, chopped
1/2 teaspoon fresh cracked black pepper
1 tablespoon balsamic vinegar
1/4 cup red onion, chopped

*(Sourdough or ciabatta make a great substitution).


Heat up your Panini press. If you don't have one, you should get one! (Have I said that before? Probably) Meanwhile, if you must make do without, use two fry pans - one to put the sandwiches in and another, one size smaller, to place on top of the sandwiches to weight down for better browning.

Combine all ingredients and divide as stuffing between the four sandwiches. Lightly oil outsides of sandwiches and grill until crispy, approximately 5 minutes.

These "sandwich thins" are something new I found at Costco. They are lovely in that you can have a sandwich without feeling all bread-bloated...Just the right amount of bread - - cuz it's really hard to go without completely but let's be realistic, sometimes wraps just aren't enough!

“Hors D'oeuvre: A ham sandwich cut into forty pieces” Jack Benny

Friday, April 23, 2010

Tropical Fruit Tart

This tart is so refreshing and amazingly versatile. You can stick with a single type of fruit or use a combo of your favorite fruits.

Depending on the fruit you choose, you can also switch up the flavor of gelatin in the glaze and leave off the nuts.

Deceptively easier to make than it looks, this is a great dessert to bring to get-togethers and it’s also a healthier alternative to heavier more calorie laden desserts.

Easy to make, healthy, impressive appearance…this tart is ALL good!


Crust Ingredients:
1 cup flour
1/4 cup confectioners’ sugar (powdered sugar)
1/2 cup (1 stick) butter, softened to room temperature
1/4 cup crushed macadamia nuts *optional.

Crust Instructions:
Preheat oven to 350-degrees. In medium bowl, whisk together flour, confectioners’ sugar and nuts. Gently stir in softened butter, do not over mix. Press into a tart pan with removable sides. Refrigerate for approximately 30 minutes. Transfer tart pan to baking sheet for stability and bake for 20 minutes or until crust is slightly golden. Leave crust in pan and cool on a rack to room temperature before filling.

Filling Ingredients:
8 ounces cream cheese
4 ounces Cool Whip topping
1 cup confectioners’ sugar
1/2 teaspoon brandy or rum *optional - Can also use imitation flavoring in place of alcohol or just eliminate entirely.

Filling Instructions:
Blend cream cheese and powdered sugar. Fold Cool Whip and brandy or rum extract into cream cheese/sugar blend. Spoon filling into cooled crust and spread evenly over bottom and to crust edge.

Topping Ingredients:
Approximately 1 quart fresh fruit, sliced and patted dry. Fruits that work well alone or combined are strawberries; mango, blueberries; raspberries - anything bright and fresh. I prefer to use several fruits of different colors. Patting the fruit dry keeps it from bleeding.
Macadamia nuts for garnish. *optional.

Topping Instructions:
Slice fruit to desired shape and thickness, and lay out decoratively atop cream cheese filling. If using strawberries by themselves, I prefer to leave them whole. Cutting off the stems, I place them cut side down so the strawberries stand up in beautiful, plump, red mounds. Be creative - depending on the fruit of choice, slice in whatever shape you desire to make a beautiful design.
If desired, add chopped/or halved macadamia nuts decoratively around the edge of the tart.

Glaze Ingredients:
2/3 cup granulated sugar
2/3 cup water
2 tablespoons cornstarch
2 to 3 tablespoons off Jell-O powder.

Hint: When you choose a flavor of Jell-O, make sure that it not only compliments the flavor of the fruit you are using, but that the color goes well too. Example; use strawberry Jell-O for strawberries, or if using multi-colors of fruit, lemon is a good choice as the colors show through the yellow shade quite well. For this tart I had peach on hand - it worked fine and the flavor was great but I still would have preferred to have had lemon on hand...it really brightens up the colors of the fruit, whereas the peach tended to make the fruit look like it was covered in caramel - not a bad look, just different.

Glaze Instructions:
In a small sauce pan over medium heat, cook sugar, water and cornstarch until it has thickened and turned opaque. Remove from heat and whisk in the Jell-O powder. Allow to cool partially before pouring over the fruit. Pour the glaze over the fruit starting in the center of the tart and circling around and around until you reach the edge. Make sure to cover all the fruit; the glaze will spread out in between the fruit on its own. Refrigerate tart, uncovered, until ready to serve. Remove tart pan rim just prior to serving. If glaze has dripped over edge of tart pan, simply run your finger around the top of the edge and that will 'cut' through the glaze for easy release. Be sure to refrigerate any unused portions.

  
“Life is uncertain. Eat dessert first.” ~ Ernestine Ulmer

Wednesday, April 21, 2010

Spring Pasta

This pasta is perfect for spring with a mix of roasted vegetables and fresh, raw vegetables in a very light cream sauce.

You can combine whatever fresh vegetables look best at the market. I would have loved to have had access to asparagus to add to this, unfortunately the batch at the store was a bit shriveled, which can give it a woody texture, so I passed on the asparagus and added slivered artichoke. Quite a good exchange.


Ingredients:
8 ounces, roasted cherry tomatoes (see instructions below)
6 roasted garlic cloves, thinly sliced (see instructions below)
1, large artichoke heart, slivered (see instructions below)
4 ounces thinly sliced Pancetta, crisped (See Recipe Categories)
1/2 cup heavy cream
1/2 cup pasta water, set aside
4 lemons, divided
1 carrot, shaved
4 ounces, Parmesiano Reggiano, shaved (see instructions below)
4 ounces, feta cheese, crumbled
1 cup cooked petite green peas
2 Roma tomato, seeded and diced
2-3 green onions, thinly sliced
1 tablespoon dried parsley (or 2 tablespoons fresh, chopped)
4-6 basil leaves, ribbons
1/4 teaspoon red pepper flakes
12 ounces lemon infused pasta (see instructions below) - In this dish I opted for whole grain Rotini.

INSTRUCTIONS
For lemon-infused pasta add two or three fresh lemons to the water you will be cooking the pasta in.
Tip: Because the pasta gets its only flavor from the water, it is very important to give the water a liberal addition of salt before boiling. Adding lemon, gives the pasta a wonderful lemon zing. I halve the lemons and squeeze the juice into the water, holding one hand underneath the lemon to catch the seeds. Discard the seed but throw the leftover rind halves into the water. The oils from the lemon are essential for adding flavor. I also add oil to the boiling water. I realize it just floats on top as the water boils so you’re probably wondering what good it does – The good comes in when you go to drain your pasta as it does aid in the noodles not sticking together in the strainer.

Boil your pasta per package instructions.  Before straining, pull out ½ cup of the boiling water and set aside. Strain the rest of the water out of the pasta and remove the lemon rinds.

In a large bowl, combine the roasted cherry tomatoes, sliced roasted garlic, slivered artichoke, crispy Pancetta, heavy cream, the pasta water you set aside, the juice of one lemon, carrot, peas, fresh tomato, green onions, basil, parsley, red pepper flakes – pour pasta atop and toss to combine. Top with shaved Parmesiano Reggiano and crumbled feta.

Roasting cherry tomatoes:
Place tomatoes on rimmed baking sheets.
(For grape tomatoes - leave whole.)
(For cherry tomatoes - halve and place cut side up.)
(For Roma tomatoes - halve, remove seeds and place cut side up.)
Drizzle tomatoes with 1 to 2 tablespoons olive oil.
Sprinkle generously with coarse kosher salt and freshly ground black pepper. *Optional: Sprinkle with 1/8 teaspoon red pepper flakes.

Roast tomatoes at 350-degrees for approximately 30 minutes or until wilted and slightly golden.

Roasting Garlic
Cut the top third off the head of one large garlic. Place garlic, cut side up, in a small baking dish. Drizzle with olive oil. Salt and pepper to taste. Cover with foil and bake 350-degrees for 30 to 45 minutes or until garlic is soft to touch. Let cool before handling, then squeeze softened garlic from paper-like casings.
For slivered roasted garlic leave cloves whole and refrigerate to firm up before slicing into slivers.
For garlic paste smash cloves while still warm with some of the oil, salt and pepper it was roasted in to form paste.

Preparing Artichoke for Slicing
Cut artichoke in half, lengthwise. Remove leaves from heart - These can be served with a dip if you wish, but for this purpose I only needed the heart (so I snacked on the tips of the leaves while making the pasta...that's the best use yet!) Remove any remaining fur from center of artichoke. Using a vegetable peeler, clean up stem of heart.


Cut heart into quarters, lengthwise.
Slice each quarter, lengthwise, into thin slices.
Toss with lemon juice to prevent browning.
Set aside.
(For use in a cold salad, refrigerate until ready to use).


For Shaved Parmesanio Reggianio use an extra large grater.
If you do not have such a large grate, you can use a vegetable
peeler and simply shave strips off the side of the block of cheese.
I've not seen a grater as large as mine before. My mother-in-law found it in an antique store - she is always spot on with those perfect, unique gifts! It's great (or should I say "grate") for making slaw as well.
 

"Life is a combination of magic and pasta." Federico Fellini

Tuesday, April 13, 2010

Colorful Fruit Salad

Colorful and Simple Fruit Salad
3 - 4 cups fresh cut fruit. Try to use at least 3 varieties and colors minimum. In this batch I used mango, strawberry, kiwi and blueberry.
1 tablespoon white balsamic vinegar
1 tablespoon honey

In small bowl whisk together honey and vinegar. If you do not have white vinegar you can use regular balsamic, but it will give the fruit a bit of a darker tint - still looks lovely though - when I've used the dark, I also sprinkled a wee bit of poppy seeds over salad - went well together.

Stir honey/balsamic dressing into fruit, toss, cover and refrigerate for 30 minutes to 1 hour for flavors to mingle and fruit to release its sweetness. Using slotted spoon, transfer fruit to another bowl just prior to serving.

Besides a lovely salad, this also makes a great dessert topping for ice cream or alone with a dollop of creme fraiche or cool whip. Easy!

Monday, April 12, 2010

Stuffing and Cheese Stuffed Chicken Breasts

Ingredients:
4 boneless, skinless chicken breasts
4 String Cheese sticks
1 box, Twin-pack (2, 6 ounce packets) Cornbread Stuffing Mix, Mrs. Cubbison's
1 can Cream of Celery soup
2 eggs, divided
1/4 cup milk
Dash Louisiana hot sauce
2-3 tablespoons olive oil
1 tablespoon butter
Instructions:
Preheat oven to 350-degrees. Working with one chicken breast at a time, place into a gallon-size zip bag, leaving baggy unzipped, pound meat out with smooth side of a meat mallet to approximately double width (about 5" x 7" x 1/4") rectangle. Remove flattened breast from bag and place on plate. Top with wax paper. Repeat process with remaining three breasts. Set aside.


Pour one of the 6 ounce bags of stuffing mix into a clean gallon-size ziploc bag. With rolling pin or smooth side of meat mallet, smash stuffing mix into crumbs. Pour into low flat bowl and set aside.

In another low flat bowl, combine milk and one egg, with one dash of hot sauce. Whisk to combine and set aside.

Place cream of celery soup (undiluted) into a medium-size, microwave safe bowl. Nuke until heated through. Add contents of second 6 ounce bag stuffing mix and one slightly beaten egg to the heated soup and stir until well combined. Divide stuffing mixture into fourths. With hands, pack one-fourth of the stuffing around one string cheese. Place stuffing encased cheese on short end of flattened chicken breast and roll into tube shape. Repeat with remaining cheese, stuffing and chicken.

Dip stuffed chicken rolls into milk/egg mixture and roll in stuffing bread crumbs. Meanwhile, heat olive oil and butter in large skillet. Place stuffed chicken rolls in hot skillet and bake approximately 3 minutes, give a quarter turn and bake another 3 minutes, repeat until all four sides are browned. Spray small casserole dish with non-stick spray and place browned stuffed chicken rolls into casserole dish. Bake uncovered for 30 minutes. Let set 5 minutes before cutting - then cut into thirds or fourths and fan out a single roll onto a plate or all four onto a platter.

This is a simple dish to prepare but it is also company worthy in that is looks fairly elegant when you cut the rolls open to expose the lovely swirls of layers and oozing cheese. The crunchy outer coating really makes this dish stand well on it's own (as in without gravy).

Tonight I served this dish with a side of scored new potatoes (recipe to follow) and some steamed broccoli. Since it is just the two of us we have two rolls leftover. I'm thinking tomorrow night I'll slice the stuffed rolls into 1/2 inch slices and serve on sourdough bread with cranberry sauce and cream cheese - should make GREAT sandwiches!

Crispy Scored New Potatoes

1 pound new potatoes
1-2 tablespoons olive oil
Kosher salt and coarse ground black pepper

Preheat oven to 350-degrees.

Cut each new potato in half. Score hashmarks just slightly into cut side of each half. Place in a single layer in a large roasting pan. Toss with salt, pepper and oil. Turn each half so that cut/scored side is up.

Bake for 30 minutes. Turn each half cut side down and continue to bake for aproximately 15 minutes more or until cut sides of potatoes are golden brown. These are so tasty they don't need butter or further seasoning.

Friday, April 9, 2010

Egg Foo Young Pie

Okay, you are going to LOVE this! You know how the best part of Thanksgiving is the sandwich the day after? Well, THIS dish is the best part of having Chinese take-outs! I came up with the idea from a dish I used to love as a child called Egg Foo Young - similar but changed up a bit, this has many, many possibilities.

This recipe works with any combo of Chinese food leftovers you have. Just make sure if any of the leftovers contain a lot of sauce, you'll want to remove the meat/veggies from that particular dish before adding it in with the filling ingredients for this pie. Tonight the leftovers I had on hand to work with were crispy honey glazed chicken, sweet and sour chicken, two egg rolls and about a cup of fried rice, plus another cup of white rice.

Here are the instructions for this amazing dish that I promise, once you make it - you'll be sure to order extra Chinese every time to insure leftovers so that you can make this Egg Foo Pie again and again.

EGG FOO YOUNG PIE
Leftover Filling:
1 refrigerated pie crust
3 cups leftover Chinese food, chopped
1 cup white rice
Custard filling:
3 eggs + 1 egg yolk
1 cup milk
1 T. flour
1 T. soy sauce
 Gravy:
2 tablespoons Sweet chili sauce
2 tablespoons Hoisin sauce
2 tablespoons Sweet & sour sauce
1 tablespoon soy sauce
1 cup cold milk
1/4 cup butter, melted
1 package Hollendaise sauce mix, highly recommend Knorr brand!
Topping:
Crunchy chow mein noodles
2 - 3 green onions, sliced on a diagonal

Instructions:
Preheat oven to 350-degrees.
Gently lay out refrigerated pie crust dough into a pie plate. No need to flute edges, as we will fold them over the filling in a rustic stil after the filling has been added.

Empty Chinese leftovers onto cutting board, again, make sure if any of the leftovers contain a lot of liquid, such as a sweet & sour sauce, to remove the meat/vegetables from the sauce and discard the sauce. Chop all of the leftovers together into small bite-size pieces, approximately 1" chunks. Put the leftovers into a microwave safe bowl and heat just until warmed through.

Pour the warm leftovers into the pie crust and spread out evenly across bottom of pie. Crumble the white rice evenly over the top of the leftover filling. Top with the grated cheese.

In medium-size bowl whisk together 3 eggs, 1 yolk, 1 cup milk, 1 tablespoon flour and 1 tablespoon soy sauce. Pour egg mixture evenly over filling ingredients.

Gently fold back pie crust edges up over filling. Pinch together any folds in the dough as you go, for a rustic edge.

Bake for 55 minutes or until top of pie is golden and eggs have set.

Check the crust about 30 minutes into the baking, if edges are already golden, cover with pie ring or foil trim to protect so the crust does not burn before the eggs have set.

Gravy:  In a small saucepan whisk together 1 cup cold milk with 1 tablespoon soy sauce and 2 tablespoons each; Sweet chili sauce, Hoisin sauce and Sweet & sour sauce, add in Hollendaise sauce mix and whisk until smooth. Add 1/4 cup melted butter and whisk sauce over medium heat until thickened and bubbly.

Pour gravy over slices of Egg Foo Pie. Top with crunchy chow mein noodles and chopped green onion. Because you'll have different leftovers each time, depending on what you order - you will have fun playing with the different combos.

'Confucious say:  Man with one chopstick go hungry'
(You'll want to show up for this meal with a fork in each hand!)

Wednesday, April 7, 2010

Chipotle-Maple Glazed Drummettes and Spicy Spanish Rice

You are going to love the blend of smokey chipotle and rich maple! My new favorite combo...

Chipotle-Maple Glazed Chicken
12-16 chicken drummettes
1/2 cup maple syrup
1/2 cup honey
1, 7 ounce can chipotle peppers in adobo sauce*
1/4 cup chopped fresh cilantro
*(Remove 2-3 peppers and set aside to use in rice).

Preheat oven to 450-degrees.
Combine the honey, maple syrup, and chipotle peppers (setting aside 2 or 3 to go in the Spanish rice) with adobo sauce in a large, re-sealable plastic bag. Smoosh contents together to mix and then add the chicken to the bag and seal with as little air as possible in the bag.  Marinate for a minimum of 2 hours or overnight.

I have found that placing meat in a baggie with a marinade, even with barely any air in the bag, parts of the meat are still left uncovered and you have to keep going in and shifting the bag to make sure the meat is equally soaked. To solve this problem, I like to put my 'marinade bags' inside another container to insure each piece of meat stays completely covered by the liquid during the whole marinade process.

Line a baking sheet with foil and spray with non-stick cooking spray. Place the chicken on a foil-lined baking shee and bake approximately 20 to 25 minutes until skin has carmalized and darkened. (Increase cooking time by approximately 10 minutes for regular size drumsticks/wings if you do not have access to drummettes).  Place chicken on serving platter and top with chopped cilanatro.

Spicy Spanish Rice
1/2 cup long grain, white rice
1/2 cup water
1, 15 ounce can, Stagg Chili, Vegetable Garden 4-bean Chili
2 or 3 chipotle peppers in adobo sauce, minced finely

I use a rice cooker and if you don't own one, I highly recommend that you look into getting one. You will never have under or overdone rice again!  Simply put all of the above ingredients into the rice cooker, stir. Cover and set the timer per your appliance recommendations, in my case for 60 minutes.   When done, carefully remove the lid - steam hurts! Stir and serve. I like to serve my Spanish rice in tortilla bowls. 

Please note; chipotle peppers are very, very spicy - so if you're not a fan of hot, you can reduce the number of chili's you add to this - or, you can open the chilis and remove their seeds (discard seeds), but if you do this, use gloves to prevent the chili oil from getting on your fingers and possibly later into your eyes.

Tuesday, April 6, 2010

Perfect Asparagus

I was on the phone with one of my many, many neices this Easter (note how I am not giving any clues as to which one). I asked what she was having for dinner, and one of the items she listed was "those green slimey things mom likes"...After some sluething, it was concluded she was describing asparagus. This prompted me to post on how to make perfect asparagus every time. I agree with my neice, when not cooked properly, aspargus is nasty stuff! By the way, my definition of perfect aspargus is that it is bright in color, crispy to the teeth and seasoned only enough to enhance the natural flavor.

First of all, when you are choosing asparagus, grasp the center of a single spear and pull gently. The spear should feel firm, and not at all rubbery. There should be no apparent wrinkles in the spears either. I try to buy asparagus that is pencil thin, not for any reason other than I don't want to have to spend the time paring it down if it is the fat kind. 

Rinse well. Place the center of a single spear between the thumb and forefinger of one hand, and grasp the farthest end of the stem with your other hand. Bend and the spear will break naturally at the place where the woody tip begins. Lay the 'snapped' spear next to the rest of the spears and cut them all the same length.
Hint:  I have found the best way to cook asparagus evenly is in a skillet. Place the spears in a single layer and cover with approximately 1 inch of water. Bring to a boil and let boil ONLY 1 MINUTE. Immediately remove asparagus from the skillet and place into a bowl of ice and water - let sit for 5 minutes. Drain. This stops the asparagus from overcooking, a.k.a. from being 'slimey' and also brightens the green color of the vegetable, which makes it more appealing. (Please note that if you are using the thicker asparagus, you may need to add 1 to 2 more minutes to the cooking time).
(See how, after the ice bath, they are almost greener than when they were fresh?!)

At this point, either cut spears on a diagonal into 2 inch sections - or leave whole. Return asparagus to the skillet. Add 1 tablespoon butter and 1 teaspoon of soy sauce. Cook over medium heat until just reheated through. Serve immediately.

I like to use soy sauce in place of salt with my cooked veggies. It adds a hint of extra flavor without being obvious it is soy. Love it!
 
Time for me to go marinade the chicken for tonight...chipotle-maple - - - watch for it!

Thursday, April 1, 2010

Colorful Stuffed Easter Eggs

Deviled Eggs, or stuffed eggs are always a hit and I use this coloring of the egg whites technique for several different occasions. To name a few:

 Bloodshot eyes for Halloween (see 10-11-09 post)
 Baby blue and/or Pastel Pink for baby showers
 Red and green for Christmas
 Bright green for St. Patrick's Day (and I also color the yolk green for this holiday!)
 For Easter (and birthdays) I keep it muli colored...

Here is how it is done:

To Make 12 Stuffed Eggs You Will Need:
7 hard boiled eggs *
6 different food colors
6 small, deep containers for dying whites (coffee cups work well)

*this gives you 2 extra white halves in case of tears or imperfections...

Slice each hard boiled egg in half lenghtwise.
Remove yolks and place in separatebowl.
Gently rinse egg whites to remove any residue left by the yolk.
Lay out wax paper to place under coloring-cups and don plastic gloves to protect hands if desired.
In each of 6 containers, place several drops of food coloring - fill the container 3/4 full with water.
Divide whites into color baths and let sit until you reach the desired depth of color.

Drain whites on paper towels.

To Stuff Eggs:
7 egg yolks
1/4 cup plus 1 tablespoon mayonnaise
1 teaspoon apple cider vinegar
1 teaspoon Dijon mustard
1/2 teaspoon super fine sugar
1/4 teaspoon salt
1/4 teaspoon cumin (optional)
dash of hot sauce (optional)
colorful sprinkles (optional - can also top with chives)

Place yolks into a fine sieve and using the back of a spoon, gently rub yolks through the sieve into a small bowl. This works like a ricer and gives the yolks a perfect, smooth texture.

Add remaining ingredients to the yolks and stir well to combine.

For a professional look, pipe yolks into the colored whites using a large star tip. If you do not own icing tips, mound yolks into colored-white with a spoon.

Top with colorful sprinkles, if desired and serve on deviled egg platter. The crunch and sweetness of the sprinkles are a great contrast for this slightly tart, slightly smokey stuffing recipe. If you do not have sprinkles, top with chives or sprinkle with sweet paprika. If available, add a spring of parsley for garnish.

(For instructions on how to make The Perfect Hard Boiled Egg Everytime, scroll back to my post dated 9-29-09).


Hint:  If you should have any leftovers, which is a rare thing, store on the serving plate, covered with a saran wrap. To prevent 'smooshing' place a round ended toothpick (or fancy hor's d's style toothpicks) into each stuffed egg before covering with saran.


If your toothpicks are the kind that are sharp on both ends - simply put a miniature marshmallow on the tip that will go next to the saran wrap to prevent it from puncturing.  (Same method of storage is good for iced brownies too).

Wednesday, March 31, 2010

Easter Nest Egg Cupcakes

Easter Egg Nest Cupcakes
1 package white cakemix
1 teaspoon almond extract
1 container cream cheese frosting
1, 8 ounce bag shredded coconut
candy eggs
green food coloring

Prepare cupcakes per package instructions, adding almond extract to the batter prior to baking.
Let cool completely before frosting.

In a zip baggy, add coconut and 2 drops green food color, close bag and mush coloring into coconut until distributed evenly throughout. Pour into coconut grass into flat bowl for dipping.

After cupcakes have cooled, frost them and dip frosted tops into the coconut grass. Arrange candy eggs on top and place on serving platter. For an "extra-puffy" next, frost the cupcakes with a thin layer of frosting and then let set until it firms up a bit, approximately a half hour or so. Then put a second layer of frosting on top and dip into coconut, rolling to catch sides of top as well.

First of all, I had surgery yesterday so am working with the use of one arm, so these cupcakes did not turn out as 'voluptuous' as they normally do - but they are still extremely cute and probably look more like they would if you had let your children/grandchild make them. In fact this is a great recipe to do with the little ones...so easy and they will be so proud of the end result!

A little FYI regarding the almond extract - the flavor is so suttle but adds a little sumpin'-sumpin' to the plain vanilla flavor, which is almost cherry-like. People love it but aren't quite sure what it is. And, this one teeny addition makes the box cake mix taste homemade, which I love.

In my next post I look forward to sharing with you how to make colorful Stuffed Easter Eggs, a staple at our Easter Dinner table, so don't forget to check back tomorrow!

Friday, March 26, 2010

Easy Stuffed French Toast

It's easier to stuff your French Toast than you think. This morning I made the PB&J version my step-son used to love so much as a child.
Stuffed French Toast
4 slices firm bread
stuffing ingredients:  Today I used peanut butter and jelly *(see options)
1 egg, slightly beaten
1/4 cup milk
1 tablespoon maple syrup
1 tablespoon butter
dash of salt
powdered sugar

Using the bread, peanut butter and jelly, make two peanut butter and jelly sandwiches.

In a small flat bowl, mix together egg, milk, maple syrup and salt. Cut each sandwich in half and dip into egg mixture.

Over medium heat, melt butter. Fry coated sandwich halves in pan until browned on all sides. Serve with powdered sugar sprinkled atop.

Options:  I say it again and again, but it bears repeating - your options are endless in any recipe! Here are a few suggestions for stuffed French Toast:
* Mixture of 1/4 cup cream cheese and 1 tablespoon powdered sugar, with sliced strawberries
   or peaches.
* Lemon curd (very refreshing)
* Peanut butter and sliced banana's.
* Peanut butter and crispy maple bacon.
* Fried (or scrambled!) egg and cheese.
* Goat cheese, toasted chopped pecans, brown sugar, chopped dates or sultanas

Also, in place of powdered sugar, you can try topping your stuffed French Toast with a variety of syrups from maple to lingonberry - any fruit and honey (I love a combo of mango, kiwi and blue berry) - toasted nuts - plain or flavored honey -  jam - Greek yogurt, etc. etc. I could go on for pages. While your sussing your options, I'm going to get eat this gorgeous French Toast before it gets cold. Seeya!

Thursday, March 25, 2010

Another Successful Recipe Renovation! Sloppy Joe leftovers into Tamale Pie

Tamale Pie
2 cups leftover sloppy joe filling
1, 8.5 ounce package Corn Muffin Mix (I prefer Jiffy brand)
1 egg, slightly beaten
1, 15.25 ounce can corn, drained - divided
1 teaspoon Taco Seasoning - divided
1/4 cup butter, melted
1/4 teaspoon ground cumin
2 dozen black olives, quartered
1/2 cup pre-shredded Mexican blend  cheese

Preheat oven to 350-degrees.
In small bowl whisk together egg, 1/2 teaspoon taco seasoning, and melted butter - add corn muffin mix and stir together, adding 1/2 can of drained corn kernels. Mix until combined and set aside.

In medium bowl combine leftover sloppy joe filling with quartered olives, 1/2 can corn kernels, 1/2 teaspoon taco seasoning, ground cumin - stir to combine. Place filling in bottom of small casserole dish.

Pour muffin mixture atop meat filling. Using back of spoon, smooth out mix, mounding slightly towards outer edge of casserole. Muffins tend to dome as they cook - to compensate, keep the center of the mix thinner in the center so it will raise evenly. 
Bake for 30 minutes or until center of corn muffin top is cooked all the way through (test with a toothpick).

Remove from oven, cover with shredded cheese and bake for another 10 to 15 minutes, until cheese is nicely golden. Let set for approximately 5 minutes before serving. I promise, no one will recognize that this dish was once Sloppy Joe's.

Wednesday, March 24, 2010

Silly kids, Sloppy Joe's aren't just for kids!

Did you know you can make sloppy joe's without a package mix or a can? They are fresh, you know exactly what you're eating and you can tweak them to suit your tastes. Here is the "guideline" I use:

Sloppy Joe's Done Your Way
1 pound ground beef
1 cup sweet Vidallia onoin, chopped
1 small shallot, diced
1 large garlic clove, minced
1, 6 ounce can tomato paste
6 ounces Cola
1/4 cup chili sauce
1 cup ketchup
1/4 cup quick-cooking rolled oats
1/4 cup  packed brown sugar
1 teaspoon Worcestershire sauce
1 teaspoon prepared yellow mustard
1 teaspoon Gourmet Garden Chili Pepper Spice Blend or;
   1/2 teaspoon chili powder *optional
Salt & Pepper to taste.
Kaiser rolls or toast to serve on. (Tonight I used Cracked Wheat Sourdough bread, lightly toasted.)

In a large skillet over med-hi temp, cook beef, onion, shallot, and garlic until beef is browned and onion is slightly translucent. Drain off excess fat if there is any.

In a separate bowl mix together to combine; tomato paste, Cola (I use the empty tomato paste can as a measuring vessel for the cola), chili sauce, ketchup, quick-cooking rolled oats, brown sugar, Worcestershire sauce, mustard and Chili Pepper sauce. Add to skillet with beef mixture.

Simmer, uncovered, over low heat, stirring occasionally for approximately 30 minutes until sauce is thickened and a bit carmalized. Add salt and pepper to taste. Serve on whatever type of bread you desire.

I have also made these substituting the cola with red wine and eliminating the yellow mustard. You can also sweeten these up by adding 1 tablespoon maple syrup. If you wan't to Mexi-fy them...add some chipotle seasoning. Any way you look at it, these are beautiful and much richer than any prepared sloppy joe mix available at the market.  A slice of sharp cheddar cheese added on top fancied the sandwiches up a bit - both in eye appeal and flavor.

Tuesday, March 23, 2010

OMG! - This original newbie got snatched up so quickly, I couldn't even get a picture!!! Meet my newest invention...

When a food disappears as soon as you set it out, that is a very, very good sign. Tonight I invented ...wait for it...PIZZA FRIES!

I kid you not - I didn't even get a chance to grab the camera on this one. You won't believe how simple these are to make. And the best part is (besides the taste) ...they are made from LEFTOVER pizza!
Here is what I did:

Pizza Fries
Ingredients:   
Leftover pizza (any style)
Pre-shredded cheese blend
Instructions:
Preheat oven to 450-degrees.
Line a baking sheet with parchment paper.
On cutting board, cut cold pizza into the shape of a French fry - in approximately 2 & 1/2" x 3/4" strips.
Place willy-nilly in a single layer onto parchment covered backing sheet.
Cover modestly with shredded cheese - don't be afraid to let the cheese fall where it may - one of the best things about these pizza fries is the crunchy cheese that melts under and beside the "fries" and crisps up to make this beautiful texture that literally makes these pizza fries irresistable.
Bake for approximately 12-14 minutes until fries are golden brown and cheese has toasted up nicely on top as well as inbetween the fries.
Next time I make these - I will have to do so in secret so I can post a photo. Enjoy! I know you will!

Sunday, March 21, 2010

Savory Gluten-Free Crackers & Guilt-Free Creamy Leek Dip

Browsing through a magazine a came across an interesting gluten-free cracker recipe. In this article the cracker was meant to be served with a sweet topping. I, however, saw savory potential - Here is what I came up with:

Savory Gluten-Free Crackers
1 1/2 cups blanched almond flour
1/2 tablespoon poppy seeds
1/2 tablespoon sesame seeds
1/2 tablespoon dried rosemary, finely crushed
1/4 teaspoon onion powder
1/4 teaspoon coarse sea salt - roasted garlic grind
1 tablespoon Extra-virgin olive oil
Freshly cracked black pepper & Kosher salt to taste
1 large egg white, lightly beaten


Preheat oven to 350-degrees.
Put first 6 dry ingredients into a medium bowl and whisk to combine.
Stir the oil and egg white into the dry ingredients.
Cut two sheets of parchment paper the size of your baking sheet.
Turnout dough onto one layer of parchment.
Bring dough together with hands to form small rectangular mound, approximately 4" x 6".
Place second sheet of parchment over the top of the dough.
Roll dough out to approximately 8" x 12" rectangle.
Place parchments with dough in center atop your baking sheet.
Remove the top sheet of parchment.
Sprinkle top of sheet of cracker dough with Kosher salt & freshly ground black pepper to taste.
Pat salt and pepper gently into dough.
Cut the dough into whatever cracker size/shape you desire. (The magazine recipe recommended 2" x 4")
Backe untilgolden brown, 12-15 minutes. Let cool.

Remember, a recipe is just a suggestion. Change your recipes to match your mood. I plan on doing a lot of experimenting with this cracker recipe. A few variations that come to mind are to switch out the herbs and seeds and replace with limitless combos such as - toasted sesame and mizithra cheese - or; roughly chopped toasted pecans with Apple Pie Seasoning, topped with a sprinkling of raw sugar - or; cumin and smoked gouda - or; Louisiana Hot Sauce and Honey - or sundried tomato and basil - I could go on and on...so could you!

For the dip, the surprise ingredient is cottage cheese - Full of protien, low in fat, and once run thru food processor, it has a very rich, creamy texture. Here is what I came up with tonight: 

Guilt-Free Creamy Leek Dip
1, 32 oz. container fat free cottage cheese, drain slightly
1, 8 oz. block lowfat cream cheese
1 package Knorr Leek Soup package mix
1 tablespoon Gourmet Garden Chili Pepper Spice Blend (tube)

I put all of the above ingredients into my Blend Tec, selected "dip" and that's all there was to it...except the eating of course! This dip would also be perfect served with an assortment of crunchy raw veggies. (I've also got the wheels turning in the back of my brain on how to incorporate this dip into a pasta sauce or maybe a cauliflour soup - Yum!)

Monday, March 15, 2010

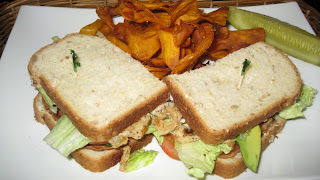
Sweet-Potato Chips & BLATTO's (Bacon, lettuce, avocado, tomato, turkey & crispy onion sandwich)

Sweet Potato Chips
Sweet potatoes (baking potatoes or yams work too-in fact these might have been yams)
Canola oil, for frying
Seasoning  *(I used a roasted garlic and sea salt blend, but you can use any seasoning you wish)


Start by pouring a minimum of 1" oil (I use Canola or Safflower oil) into your deep fryer. My crockpot doubles as both, so I just set the temperature to "fry" and know it is ready when I dip the tip of whatever I happen to be frying at the time into the oil - if it sizzles it is ready. Do not over crowd your oil. Only put enough items to be fried to make a single layer.  For chips you really need to have either an extremely sharp knife and very steady hand - or much easier, a mandolin slicer. (I LOVE my mandolin!)
Slice your sweet potatoes as thin as possible. Once the oil is hot enough, fry chips in batches - they only take a few seconds. You will see the center of the chip bubble up, this is where I use tongs to flip them. By the time you get the 8 to 10 chips flipped it is time to remove them to a paper towel to drain and season. After seeing how easy these were to make, I am excited to experiment with other root vegetables so watch for future postings. =)

The B.L.A.T.T.O. Club Sandwich
(Bacon, lettuce, avocado, tomato, turkey and French fried onion)
I finally got that roast turkey sandwich I was craving...but as you may be figuring out about me, I always have something leftover in the fridge I need to use up. Tonight I needed to work an avocado from our taco nights, plus there were the French fried onions leftover from last nights green bean casserole. Hence, the B.L.T. grew into the B.L.A.T.T.O. - - -


Discoveries ~ 1) Just like fried chicken, when you store your French Fried Onions, do not cover them if you want to keep them fresh. 2) When frying sweet potatoes, it is harder to tell when they are 'done' than when working with a regular potato as they are so much darker in color...to get the chips evenly crispy, fry any thicker chips together (as well as any extra thin strips simultaneously). It's no big deal, they taste great if not quite done...I'm just a major crunch freak so coming across an occasional chewy chip center doesn't do it for me.

Ideas to try ~ This is the first time I have made sweet-potato chips but I have made sweet potato fries before and they taste REALLY great with a sweet-salty seasoning (equal amounts of super fine sugar and salt). I've also added a dash of cayenne pepper to the sugar/salt blend...mmmm mmm.

I can't wait to peruse the produce department for other root veggies to try this on...sugar beets, rutabegas, carrots...wow, who doesn't want to play - seriously!


Sunday, March 14, 2010

Like a mini-Thanksgiving...

I had purchased a bone-in turkey breast to roast because I was craving turkey meat for sandwiches...not the pressed-processed junk you find in most deli's but the real thing. However, after spending the day tending to my bed-ridden hubby, I figured we could both do with a "comfort" meal. I decided to roast the turkey and serve with mashed potatoes, gravy and since I had a few leftover green beans, a form of green-bean hot-dish.

Roast Turkey Breast:  Oil the turkey breast with approximately 2 T. olive oil and sprinkle generously with salt and pepper over all sides. Place the breast, skin side up, in a roasting pan and then sliced up 4 T. pats of hard butter, and shove underneath the turkey skin. Covere the breast loosely with foil and baked it at 350-degrees for an hour - at which time you'll want to remove the foil - drain the drippings for the gravy - and return the breast to the oven to finish cooking for approximately 30 minutes. (Meat thermometer should read 161-degrees). When the roast was done I removed it from the oven - recovered it with foil and let it sit for 20 minutes before carving up. During this time the meat will continue to cook and the juices we re-absorb into the meat.

First off, I knew the breast would not render enough drippings for gravy, so I turned to my pantry for one of my favorite stand-by's...Country gravy mix. Instead of following the package directions, I mixed the gravy powder with 1 & 1/2 cups chicken broth and 1/2 cup of the drippings from the turkey breast - brought it to a boil in a small saucepan, then turned the heat to low and stirred constantly until thickened.

I added one small can of green beans to the wee amount of cooked fresh green beans I had from a previous meal. In a medium bowl I combined one can of cream of mushroom soup, 1 T. flour, and 1/4 can milk - stirred to combine and then tossed in the green beans and stirred to mix. Put this mixture in a casserole and baked it at 350-degrees for 30 minutes.

For the French Onion Topping - I didn't have any in the pantry to I decided to make some. I had done this before when we spent Thanksgiving in Australia this past November. As they did not carry such an item in the stores, I made my own. Here is how:   For just the hubby and I, I cut 1/2 sweet onion into slices approximately 1/4" x 1" to 1 1/2" strips. In a quart-size zip-baggy I put a few dashes of Louisiana Hot sauce and 1 c. milk...smooshed together to mix and added the sliced onion. I let them soak for about a half hour before draining. In another quart-size baggy I added 3/4 c. flour with 1 T. each salt and pepper. Into this bag I added the drained onion strips and tossed to coat. Shaking off the excess flour, add the onion to a pan filled with 1" high vegetable oil heated to approximately 350-degrees. Cook in batches if needed - never adding more onion that can cover the bottom of the pan. Remove golden onion bits from the oil with a straining spoon and let drain on paper towel.  Instead of adding these to the top of the casserole while baking - I learned from my experience in Australia that the onions get too well-done - so instead, I waited until I plated up the beans to put the crunchy goodies on top for serving.

Final step was to open a can of cranberry sauce and serve everything up on a tray to my hubby who was delightfully surprised at this unexpected mini-Thanksgiving meal.

Saturday, March 13, 2010

More stretching techniques...

Working with leftovers can be challenging. First of all, if you're like me, you don't look forward to eating the same meal two nights in a row. Secondly, there is often a smidgeon of food left - you hate to throw it out but there's not quite enough for another meal. This is where creativity comes in handy.

For today's dinner I had 1 cup of leftover taco-seasoned shredded beef and 1/4 of an avocado that needed using. (We had taco salads the night before).  So I nuked the shredded beef until it was heated through and stirred in approximately 1 cup pre-shredded Mexican blend cheese. Spread this mixture over one side each of two spinach-flour tortilla wraps - rolled them up,  individually, and heated them in my paninin press until just slightly browned.

I smashed up the leftover quarter of avocado with a pinch of salt and added 1/2 cup sour cream - stirring together until smooth.

Piled some shredded lettuce in the center of the plate. Topped that with the cooked wraps, which I had cut each into thirds. Added a few leftover salad veggies - topped it off with my avocado-sour cream dressing and we had a beautiful dinner that in no way resembled leftovers.

I so love to play with my food!
 
Site Meter