Showing posts with label Dessert. Show all posts

Friday, April 23, 2010

Tropical Fruit Tart

This tart is so refreshing and amazingly versatile. You can stick with a single type of fruit or use a combo of your favorite fruits.

Depending on the fruit you choose, you can also switch up the flavor of gelatin in the glaze and leave off the nuts.

Deceptively easier to make than it looks, this is a great dessert to bring to get-togethers and it’s also a healthier alternative to heavier more calorie laden desserts.

Easy to make, healthy, impressive appearance…this tart is ALL good!


Crust Ingredients:
1 cup flour
1/4 cup confectioners’ sugar (powdered sugar)
1/2 cup (1 stick) butter, softened to room temperature
1/4 cup crushed macadamia nuts *optional.

Crust Instructions:
Preheat oven to 350-degrees. In medium bowl, whisk together flour, confectioners’ sugar and nuts. Gently stir in softened butter, do not over mix. Press into a tart pan with removable sides. Refrigerate for approximately 30 minutes. Transfer tart pan to baking sheet for stability and bake for 20 minutes or until crust is slightly golden. Leave crust in pan and cool on a rack to room temperature before filling.

Filling Ingredients:
8 ounces cream cheese
4 ounces Cool Whip topping
1 cup confectioners’ sugar
1/2 teaspoon brandy or rum *optional - Can also use imitation flavoring in place of alcohol or just eliminate entirely.

Filling Instructions:
Blend cream cheese and powdered sugar. Fold Cool Whip and brandy or rum extract into cream cheese/sugar blend. Spoon filling into cooled crust and spread evenly over bottom and to crust edge.

Topping Ingredients:
Approximately 1 quart fresh fruit, sliced and patted dry. Fruits that work well alone or combined are strawberries; mango, blueberries; raspberries - anything bright and fresh. I prefer to use several fruits of different colors. Patting the fruit dry keeps it from bleeding.
Macadamia nuts for garnish. *optional.

Topping Instructions:
Slice fruit to desired shape and thickness, and lay out decoratively atop cream cheese filling. If using strawberries by themselves, I prefer to leave them whole. Cutting off the stems, I place them cut side down so the strawberries stand up in beautiful, plump, red mounds. Be creative - depending on the fruit of choice, slice in whatever shape you desire to make a beautiful design.
If desired, add chopped/or halved macadamia nuts decoratively around the edge of the tart.

Glaze Ingredients:
2/3 cup granulated sugar
2/3 cup water
2 tablespoons cornstarch
2 to 3 tablespoons off Jell-O powder.

Hint: When you choose a flavor of Jell-O, make sure that it not only compliments the flavor of the fruit you are using, but that the color goes well too. Example; use strawberry Jell-O for strawberries, or if using multi-colors of fruit, lemon is a good choice as the colors show through the yellow shade quite well. For this tart I had peach on hand - it worked fine and the flavor was great but I still would have preferred to have had lemon on hand...it really brightens up the colors of the fruit, whereas the peach tended to make the fruit look like it was covered in caramel - not a bad look, just different.

Glaze Instructions:
In a small sauce pan over medium heat, cook sugar, water and cornstarch until it has thickened and turned opaque. Remove from heat and whisk in the Jell-O powder. Allow to cool partially before pouring over the fruit. Pour the glaze over the fruit starting in the center of the tart and circling around and around until you reach the edge. Make sure to cover all the fruit; the glaze will spread out in between the fruit on its own. Refrigerate tart, uncovered, until ready to serve. Remove tart pan rim just prior to serving. If glaze has dripped over edge of tart pan, simply run your finger around the top of the edge and that will 'cut' through the glaze for easy release. Be sure to refrigerate any unused portions.

  
“Life is uncertain. Eat dessert first.” ~ Ernestine Ulmer

Wednesday, March 31, 2010

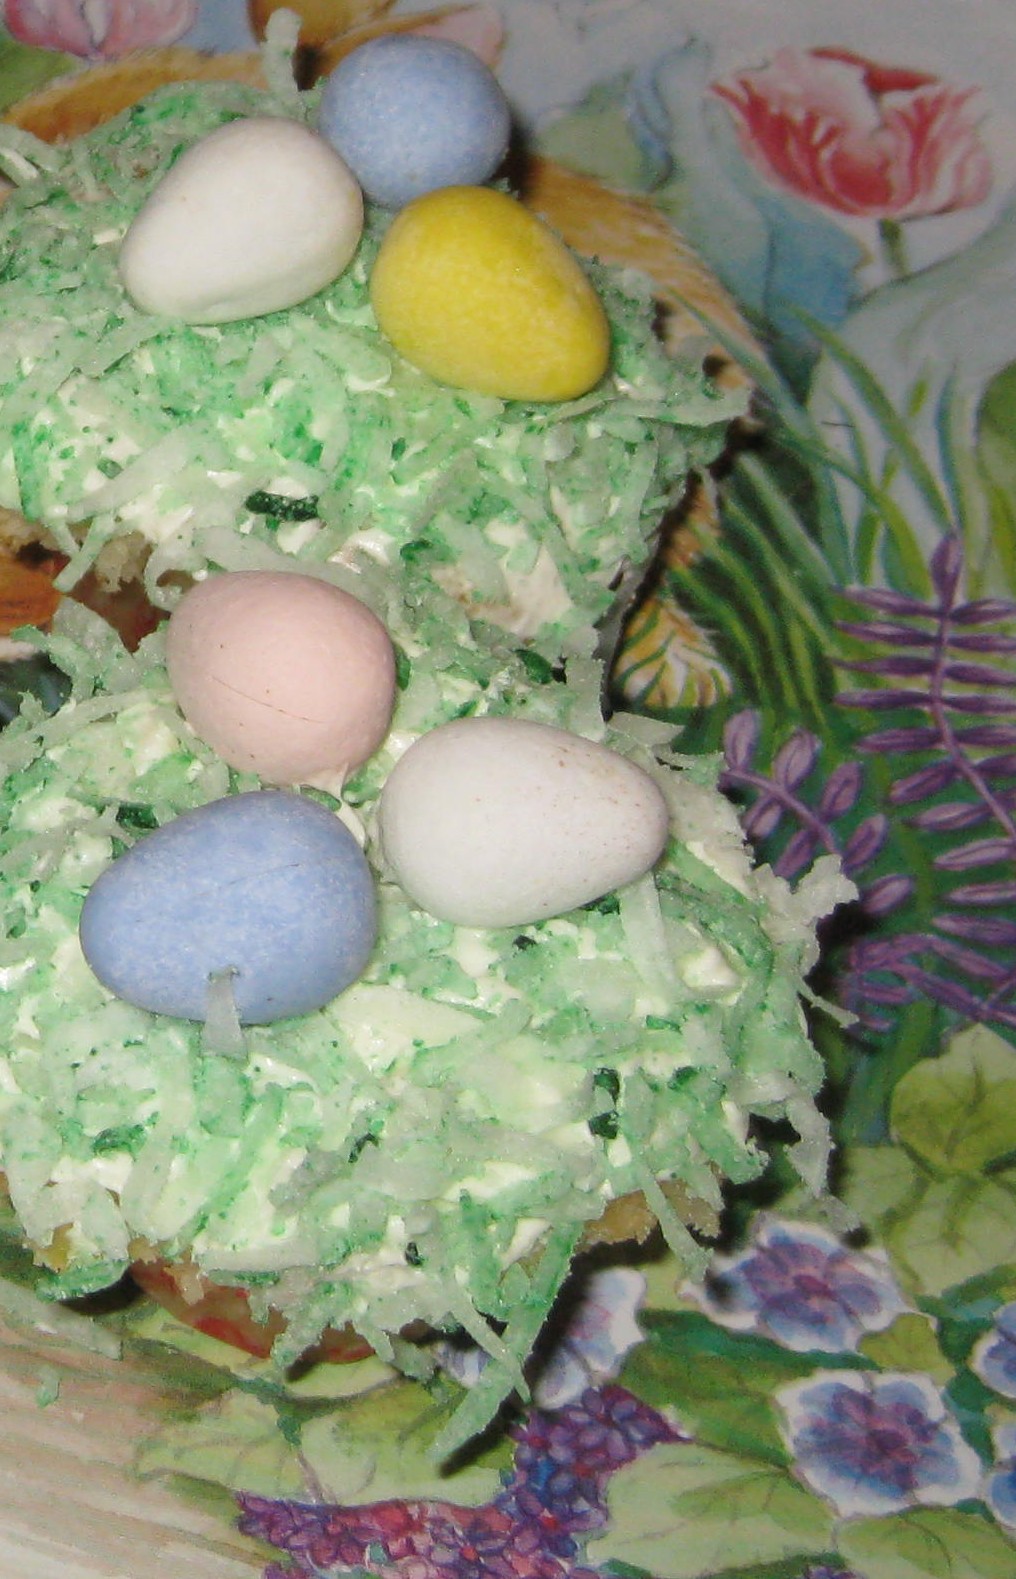
Easter Nest Egg Cupcakes

Easter Egg Nest Cupcakes
1 package white cakemix
1 teaspoon almond extract
1 container cream cheese frosting
1, 8 ounce bag shredded coconut
candy eggs
green food coloring

Prepare cupcakes per package instructions, adding almond extract to the batter prior to baking.
Let cool completely before frosting.

In a zip baggy, add coconut and 2 drops green food color, close bag and mush coloring into coconut until distributed evenly throughout. Pour into coconut grass into flat bowl for dipping.

After cupcakes have cooled, frost them and dip frosted tops into the coconut grass. Arrange candy eggs on top and place on serving platter. For an "extra-puffy" next, frost the cupcakes with a thin layer of frosting and then let set until it firms up a bit, approximately a half hour or so. Then put a second layer of frosting on top and dip into coconut, rolling to catch sides of top as well.

First of all, I had surgery yesterday so am working with the use of one arm, so these cupcakes did not turn out as 'voluptuous' as they normally do - but they are still extremely cute and probably look more like they would if you had let your children/grandchild make them. In fact this is a great recipe to do with the little ones...so easy and they will be so proud of the end result!

A little FYI regarding the almond extract - the flavor is so suttle but adds a little sumpin'-sumpin' to the plain vanilla flavor, which is almost cherry-like. People love it but aren't quite sure what it is. And, this one teeny addition makes the box cake mix taste homemade, which I love.

In my next post I look forward to sharing with you how to make colorful Stuffed Easter Eggs, a staple at our Easter Dinner table, so don't forget to check back tomorrow!

Wednesday, October 28, 2009

FREAKY FINGERS

FREAKY FINGERS:
Ingredients:
1 cup butter, softened
1 cup powdered sugar
1 egg
1 teaspoon vanilla extract
1 teaspoon almond extract
Green food color
2 3/4 cups all-purpose flour
1 teaspoon baking powder
1 teaspoon salt
1/2 cup sliced almonds
Red gel icing
1/4 cup powdered sugar
1 teaspoon water


In a large mixing bowl, beat the butter until smooth and creamy. In a separate small bowl beat egg with both extracts and food color until blended, add to butter mixture, along with 1 cup sugar. Beat until combined.

In a separate bowl whisk together flour, baking powder, and salt. Add to butter mixture in three batches, scraping down bowl between batches.

Cover dough with plastic wrap and refrigerate for 30 minutes.

Preheat the oven to 325°F.

Working with one quarter of the dough at a time and keeping remainder refrigerated. Use your hands to roll a log of dough approximately 1/2 inch by 3-4 inches in diameter. Shape each log into a finger, making the center of the log wider for the knuckle. Place on a parchment covered baking sheet, about 3 inches apart. If the dough begins to get sticky, return it to the fridge for a few minutes to stiffen up.

Use the blade of a butter knife to make knuckle marks on the fingers and then the broad side of the tip of the knife to make a slight flat imprint for a nail bed.

Bake 20-25 minutes, until fingers are slightly golden. Remove from the oven and let cool.

Meanwhile, mix together 1/4 cup powdered sugar and water in a small bowl until the consistency is similar to that of a paste.

On each cooled cookie finger, place a drop of red food color gel on the nail bed. Spread a dollop of sugar-water mixture over backside of an almond slice and place atop red gel dollop on nail bed, wide end of the almond slice at the base of the bed. The red gel will ooze out of the sides of the almond. Fill in any cracks in the dough with red food color gel to resemble blood. Let dry uncovered for about 30 minutes.

Makes approximately 24-30 fingers.

Monday, October 26, 2009

A Beautiful Ham-Aspargus Quiche AND Edible Fake Vomit Cookies - Really?

Before we get into the Halloween Ghoulish Gourmet stuff, I'm going to share a wonderful quiche recipe with you. The Dijon mustard really compliments the smoked ham in this recipe - and the tanginess of the Jarlsberg partners perfectly with the creaminess of the gouda making this easy quiche extra elegant.

HAM-ASPARAGUS OMELET
3 eggs, plus one yolk
1 ½ cups fat free half-n-half
1 tablespoon flour
1 tablespoon Dijon mustard
1/2 teaspoon salt
Dash or two (or three, or four) of Tabasco sauce
1 bunch asparagus, woody ends removed – Set aside 8 asparagus, cut remaining into 1 inch diagonal bits
1 cup smoked ham, diced
1 shallot bulb, minced finely
3/4 cup Jarlsberg cheese, grated
3/4 cup Gouda cheese, grated
1 premade pie crust dough

Preheat oven to 375-degrees. Prepare piecrust and place into pie dish – crimp edges, refrigerate until ready to fill.

In medium bowl, whisk eggs, half-n-half, flour, Dijon, salt and Tabasco until blended thoroughly. Set aside.

Toss both cheeses together to mix thoroughly. Set aside.

In separate small bowl mix diced ham, cut asparagus, minced shallot. Spread mixture over bottom of pie crust. Sprinkle two-thirds of the cheese evenly over meat mixture. Place the 8 whole asparagus stems in a wheel design over the top of the cheese and sprinkle with remainder of the cheese. Carefully pour egg mixture over all. Place in oven and bake for 35 – 45 minutes, until center of quiche is firm. Cool slightly to set prior to serving.

Helpful Hint:  I usually check my pies/quiches approximately 20 minutes into the baking time as the crust is usually nicely browned by then. At this point I place a pie crust protector over the crust to keep it from over browning. If you do not own a pie crust protector, simply cover pie crust edges with foil strips and return to oven until dish is finished cooking.

NOW FOR THE FUN STUFF! 

EDIBLE FAKE VOMIT, REALLY?
This recipe is sooooo flexible. I encourage you to play with your food! Mix it up - make it fun!

I am giving you my "basic" vomit recipe but I cannot stress how flexible this recipe really is. Today when I made this batch, I only had 1 cup of coconut on hand - so instead, I added 1 cup puffed rice cereal and 1 cup of slightly crushed Cinnamon Toast Crunch cereal to make up for the missing 2 cups of coconut needed.

The result was similar yet totally different, if that makes sense. I must say I prefer them cereal free - with coconut only they tend to spread out better, more like a vomit splat than this more formed version. Still, the overall effect still works and they taste great!


Here is my original basic recipe:

EDIBLE FAKE VOMIT
1, 14 oz. can sweetened condensed milk
2, 5 oz. bags sweetened, shaved coconut
1 cup sweetened, flake coconut
1 cup colored mini marshmallows
1/2 cup butterscotch chips (or peanut butter chips)
1 teaspoon vanilla extract
1/2 teaspoon almond extract
1/4 teaspoon brandy extract
2 drops Neon purple food coloring
1 drop Neon blue food coloring
2 drops Neon pink food coloring

Preheat oven to 325 degrees F. Cover a baking sheet with parchment paper.
In a large mixing bowl, use a rubber spatula to mix together sweetened condensed milk, extracts, and food coloring. You want to keep tweaking the color until you get a good pinkish hue. Add remaining ingredients and stir until combined.

Drop by heaping tablespoons onto prepared baking sheet. Don’t worry about dropping into neat mounds – you want a ‘random splatter’ look about them. Bake for 13-15 minutes (watch carefully – marshmallows can burn quickly). Remove and transfer onto wire racks to cool. The texture is meant to be chewy. These cookies will harden as they cool.

Makes approximately 1 ½ to 2 dozen depending on size of splats.

Fun Additions:
Chop up a few candy corns using a ridged blade to resemble half eaten bites. Add these to the cookies immediately after you remove them from the oven, but before they cool and set up.

* Take it to the Extreme and serve with shots of "Pepto Bismol" (Bailey's Irish Cream with Neon Pink food coloring added).
 
Site Meter