Wednesday, March 31, 2010

Easter Nest Egg Cupcakes

Easter Egg Nest Cupcakes
1 package white cakemix
1 teaspoon almond extract
1 container cream cheese frosting
1, 8 ounce bag shredded coconut
candy eggs
green food coloring

Prepare cupcakes per package instructions, adding almond extract to the batter prior to baking.
Let cool completely before frosting.

In a zip baggy, add coconut and 2 drops green food color, close bag and mush coloring into coconut until distributed evenly throughout. Pour into coconut grass into flat bowl for dipping.

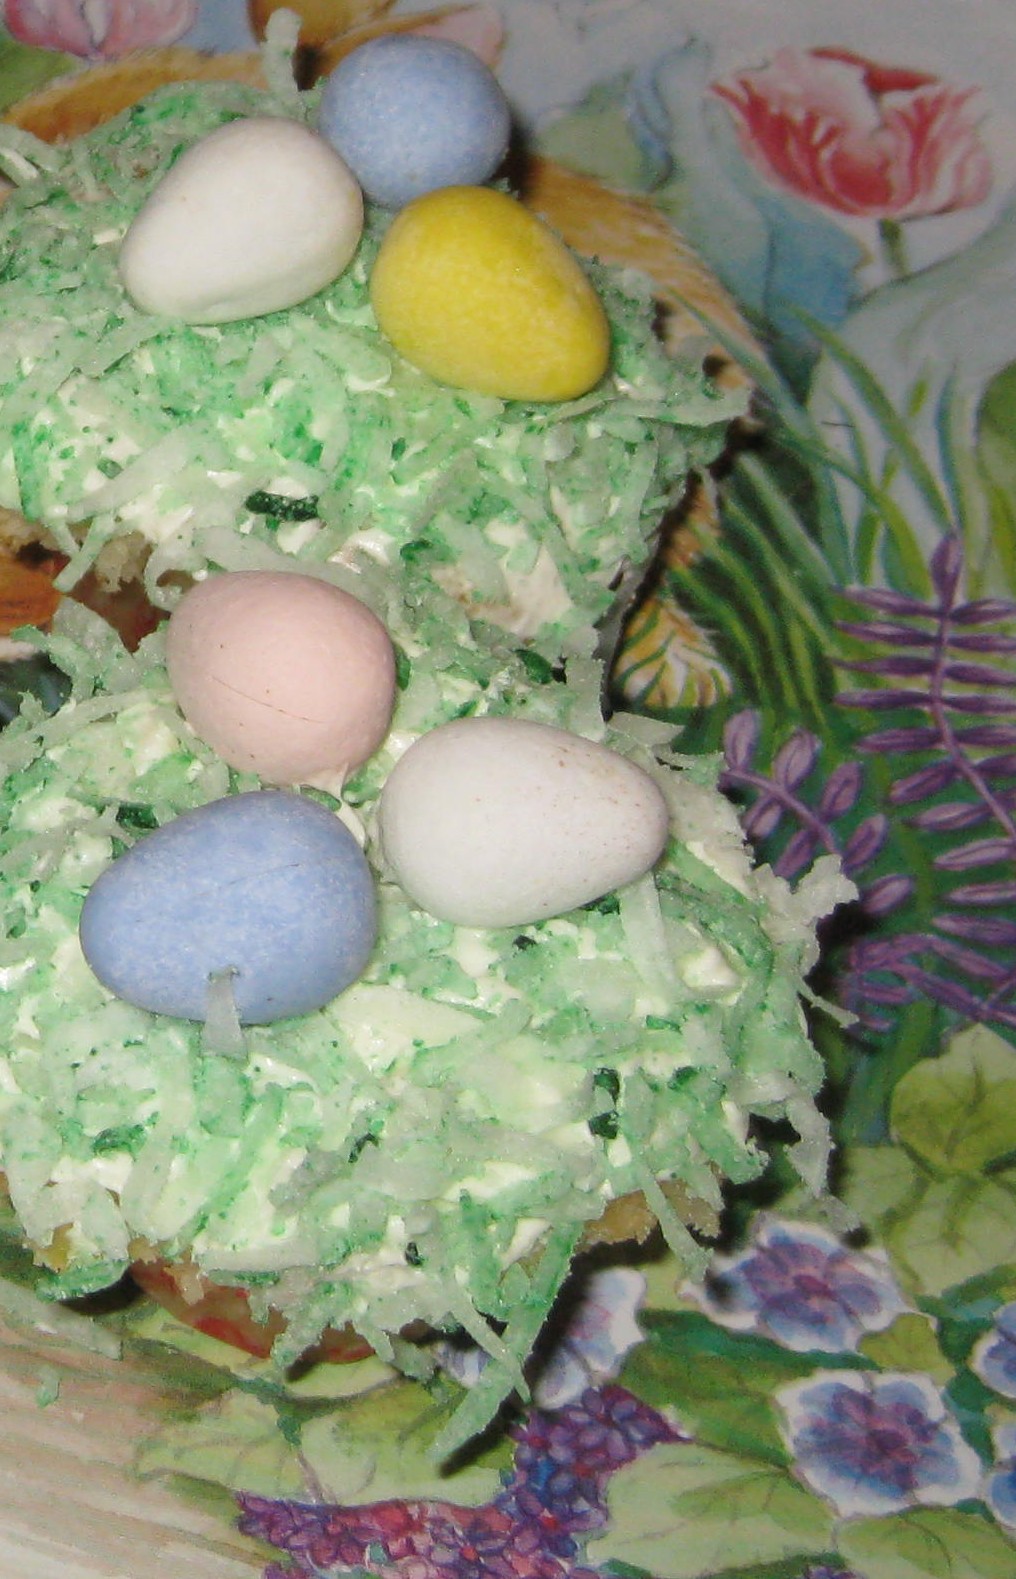
After cupcakes have cooled, frost them and dip frosted tops into the coconut grass. Arrange candy eggs on top and place on serving platter. For an "extra-puffy" next, frost the cupcakes with a thin layer of frosting and then let set until it firms up a bit, approximately a half hour or so. Then put a second layer of frosting on top and dip into coconut, rolling to catch sides of top as well.

First of all, I had surgery yesterday so am working with the use of one arm, so these cupcakes did not turn out as 'voluptuous' as they normally do - but they are still extremely cute and probably look more like they would if you had let your children/grandchild make them. In fact this is a great recipe to do with the little ones...so easy and they will be so proud of the end result!

A little FYI regarding the almond extract - the flavor is so suttle but adds a little sumpin'-sumpin' to the plain vanilla flavor, which is almost cherry-like. People love it but aren't quite sure what it is. And, this one teeny addition makes the box cake mix taste homemade, which I love.

In my next post I look forward to sharing with you how to make colorful Stuffed Easter Eggs, a staple at our Easter Dinner table, so don't forget to check back tomorrow!

Friday, March 26, 2010

Easy Stuffed French Toast

It's easier to stuff your French Toast than you think. This morning I made the PB&J version my step-son used to love so much as a child.
Stuffed French Toast
4 slices firm bread
stuffing ingredients:  Today I used peanut butter and jelly *(see options)
1 egg, slightly beaten
1/4 cup milk
1 tablespoon maple syrup
1 tablespoon butter
dash of salt
powdered sugar

Using the bread, peanut butter and jelly, make two peanut butter and jelly sandwiches.

In a small flat bowl, mix together egg, milk, maple syrup and salt. Cut each sandwich in half and dip into egg mixture.

Over medium heat, melt butter. Fry coated sandwich halves in pan until browned on all sides. Serve with powdered sugar sprinkled atop.

Options:  I say it again and again, but it bears repeating - your options are endless in any recipe! Here are a few suggestions for stuffed French Toast:
* Mixture of 1/4 cup cream cheese and 1 tablespoon powdered sugar, with sliced strawberries
   or peaches.
* Lemon curd (very refreshing)
* Peanut butter and sliced banana's.
* Peanut butter and crispy maple bacon.
* Fried (or scrambled!) egg and cheese.
* Goat cheese, toasted chopped pecans, brown sugar, chopped dates or sultanas

Also, in place of powdered sugar, you can try topping your stuffed French Toast with a variety of syrups from maple to lingonberry - any fruit and honey (I love a combo of mango, kiwi and blue berry) - toasted nuts - plain or flavored honey -  jam - Greek yogurt, etc. etc. I could go on for pages. While your sussing your options, I'm going to get eat this gorgeous French Toast before it gets cold. Seeya!

Thursday, March 25, 2010

Another Successful Recipe Renovation! Sloppy Joe leftovers into Tamale Pie

Tamale Pie
2 cups leftover sloppy joe filling
1, 8.5 ounce package Corn Muffin Mix (I prefer Jiffy brand)
1 egg, slightly beaten
1, 15.25 ounce can corn, drained - divided
1 teaspoon Taco Seasoning - divided
1/4 cup butter, melted
1/4 teaspoon ground cumin
2 dozen black olives, quartered
1/2 cup pre-shredded Mexican blend  cheese

Preheat oven to 350-degrees.
In small bowl whisk together egg, 1/2 teaspoon taco seasoning, and melted butter - add corn muffin mix and stir together, adding 1/2 can of drained corn kernels. Mix until combined and set aside.

In medium bowl combine leftover sloppy joe filling with quartered olives, 1/2 can corn kernels, 1/2 teaspoon taco seasoning, ground cumin - stir to combine. Place filling in bottom of small casserole dish.

Pour muffin mixture atop meat filling. Using back of spoon, smooth out mix, mounding slightly towards outer edge of casserole. Muffins tend to dome as they cook - to compensate, keep the center of the mix thinner in the center so it will raise evenly. 
Bake for 30 minutes or until center of corn muffin top is cooked all the way through (test with a toothpick).

Remove from oven, cover with shredded cheese and bake for another 10 to 15 minutes, until cheese is nicely golden. Let set for approximately 5 minutes before serving. I promise, no one will recognize that this dish was once Sloppy Joe's.

Wednesday, March 24, 2010

Silly kids, Sloppy Joe's aren't just for kids!

Did you know you can make sloppy joe's without a package mix or a can? They are fresh, you know exactly what you're eating and you can tweak them to suit your tastes. Here is the "guideline" I use:

Sloppy Joe's Done Your Way
1 pound ground beef
1 cup sweet Vidallia onoin, chopped
1 small shallot, diced
1 large garlic clove, minced
1, 6 ounce can tomato paste
6 ounces Cola
1/4 cup chili sauce
1 cup ketchup
1/4 cup quick-cooking rolled oats
1/4 cup  packed brown sugar
1 teaspoon Worcestershire sauce
1 teaspoon prepared yellow mustard
1 teaspoon Gourmet Garden Chili Pepper Spice Blend or;
   1/2 teaspoon chili powder *optional
Salt & Pepper to taste.
Kaiser rolls or toast to serve on. (Tonight I used Cracked Wheat Sourdough bread, lightly toasted.)

In a large skillet over med-hi temp, cook beef, onion, shallot, and garlic until beef is browned and onion is slightly translucent. Drain off excess fat if there is any.

In a separate bowl mix together to combine; tomato paste, Cola (I use the empty tomato paste can as a measuring vessel for the cola), chili sauce, ketchup, quick-cooking rolled oats, brown sugar, Worcestershire sauce, mustard and Chili Pepper sauce. Add to skillet with beef mixture.

Simmer, uncovered, over low heat, stirring occasionally for approximately 30 minutes until sauce is thickened and a bit carmalized. Add salt and pepper to taste. Serve on whatever type of bread you desire.

I have also made these substituting the cola with red wine and eliminating the yellow mustard. You can also sweeten these up by adding 1 tablespoon maple syrup. If you wan't to Mexi-fy them...add some chipotle seasoning. Any way you look at it, these are beautiful and much richer than any prepared sloppy joe mix available at the market.  A slice of sharp cheddar cheese added on top fancied the sandwiches up a bit - both in eye appeal and flavor.

Tuesday, March 23, 2010

OMG! - This original newbie got snatched up so quickly, I couldn't even get a picture!!! Meet my newest invention...

When a food disappears as soon as you set it out, that is a very, very good sign. Tonight I invented ...wait for it...PIZZA FRIES!

I kid you not - I didn't even get a chance to grab the camera on this one. You won't believe how simple these are to make. And the best part is (besides the taste) ...they are made from LEFTOVER pizza!
Here is what I did:

Pizza Fries
Ingredients:   
Leftover pizza (any style)
Pre-shredded cheese blend
Instructions:
Preheat oven to 450-degrees.
Line a baking sheet with parchment paper.
On cutting board, cut cold pizza into the shape of a French fry - in approximately 2 & 1/2" x 3/4" strips.
Place willy-nilly in a single layer onto parchment covered backing sheet.
Cover modestly with shredded cheese - don't be afraid to let the cheese fall where it may - one of the best things about these pizza fries is the crunchy cheese that melts under and beside the "fries" and crisps up to make this beautiful texture that literally makes these pizza fries irresistable.
Bake for approximately 12-14 minutes until fries are golden brown and cheese has toasted up nicely on top as well as inbetween the fries.
Next time I make these - I will have to do so in secret so I can post a photo. Enjoy! I know you will!

Sunday, March 21, 2010

Savory Gluten-Free Crackers & Guilt-Free Creamy Leek Dip

Browsing through a magazine a came across an interesting gluten-free cracker recipe. In this article the cracker was meant to be served with a sweet topping. I, however, saw savory potential - Here is what I came up with:

Savory Gluten-Free Crackers
1 1/2 cups blanched almond flour
1/2 tablespoon poppy seeds
1/2 tablespoon sesame seeds
1/2 tablespoon dried rosemary, finely crushed
1/4 teaspoon onion powder
1/4 teaspoon coarse sea salt - roasted garlic grind
1 tablespoon Extra-virgin olive oil
Freshly cracked black pepper & Kosher salt to taste
1 large egg white, lightly beaten


Preheat oven to 350-degrees.
Put first 6 dry ingredients into a medium bowl and whisk to combine.
Stir the oil and egg white into the dry ingredients.
Cut two sheets of parchment paper the size of your baking sheet.
Turnout dough onto one layer of parchment.
Bring dough together with hands to form small rectangular mound, approximately 4" x 6".
Place second sheet of parchment over the top of the dough.
Roll dough out to approximately 8" x 12" rectangle.
Place parchments with dough in center atop your baking sheet.
Remove the top sheet of parchment.
Sprinkle top of sheet of cracker dough with Kosher salt & freshly ground black pepper to taste.
Pat salt and pepper gently into dough.
Cut the dough into whatever cracker size/shape you desire. (The magazine recipe recommended 2" x 4")
Backe untilgolden brown, 12-15 minutes. Let cool.

Remember, a recipe is just a suggestion. Change your recipes to match your mood. I plan on doing a lot of experimenting with this cracker recipe. A few variations that come to mind are to switch out the herbs and seeds and replace with limitless combos such as - toasted sesame and mizithra cheese - or; roughly chopped toasted pecans with Apple Pie Seasoning, topped with a sprinkling of raw sugar - or; cumin and smoked gouda - or; Louisiana Hot Sauce and Honey - or sundried tomato and basil - I could go on and on...so could you!

For the dip, the surprise ingredient is cottage cheese - Full of protien, low in fat, and once run thru food processor, it has a very rich, creamy texture. Here is what I came up with tonight: 

Guilt-Free Creamy Leek Dip
1, 32 oz. container fat free cottage cheese, drain slightly
1, 8 oz. block lowfat cream cheese
1 package Knorr Leek Soup package mix
1 tablespoon Gourmet Garden Chili Pepper Spice Blend (tube)

I put all of the above ingredients into my Blend Tec, selected "dip" and that's all there was to it...except the eating of course! This dip would also be perfect served with an assortment of crunchy raw veggies. (I've also got the wheels turning in the back of my brain on how to incorporate this dip into a pasta sauce or maybe a cauliflour soup - Yum!)

Monday, March 15, 2010

Sweet-Potato Chips & BLATTO's (Bacon, lettuce, avocado, tomato, turkey & crispy onion sandwich)

Sweet Potato Chips
Sweet potatoes (baking potatoes or yams work too-in fact these might have been yams)
Canola oil, for frying
Seasoning  *(I used a roasted garlic and sea salt blend, but you can use any seasoning you wish)


Start by pouring a minimum of 1" oil (I use Canola or Safflower oil) into your deep fryer. My crockpot doubles as both, so I just set the temperature to "fry" and know it is ready when I dip the tip of whatever I happen to be frying at the time into the oil - if it sizzles it is ready. Do not over crowd your oil. Only put enough items to be fried to make a single layer.  For chips you really need to have either an extremely sharp knife and very steady hand - or much easier, a mandolin slicer. (I LOVE my mandolin!)
Slice your sweet potatoes as thin as possible. Once the oil is hot enough, fry chips in batches - they only take a few seconds. You will see the center of the chip bubble up, this is where I use tongs to flip them. By the time you get the 8 to 10 chips flipped it is time to remove them to a paper towel to drain and season. After seeing how easy these were to make, I am excited to experiment with other root vegetables so watch for future postings. =)

The B.L.A.T.T.O. Club Sandwich
(Bacon, lettuce, avocado, tomato, turkey and French fried onion)
I finally got that roast turkey sandwich I was craving...but as you may be figuring out about me, I always have something leftover in the fridge I need to use up. Tonight I needed to work an avocado from our taco nights, plus there were the French fried onions leftover from last nights green bean casserole. Hence, the B.L.T. grew into the B.L.A.T.T.O. - - -


Discoveries ~ 1) Just like fried chicken, when you store your French Fried Onions, do not cover them if you want to keep them fresh. 2) When frying sweet potatoes, it is harder to tell when they are 'done' than when working with a regular potato as they are so much darker in color...to get the chips evenly crispy, fry any thicker chips together (as well as any extra thin strips simultaneously). It's no big deal, they taste great if not quite done...I'm just a major crunch freak so coming across an occasional chewy chip center doesn't do it for me.

Ideas to try ~ This is the first time I have made sweet-potato chips but I have made sweet potato fries before and they taste REALLY great with a sweet-salty seasoning (equal amounts of super fine sugar and salt). I've also added a dash of cayenne pepper to the sugar/salt blend...mmmm mmm.

I can't wait to peruse the produce department for other root veggies to try this on...sugar beets, rutabegas, carrots...wow, who doesn't want to play - seriously!


Sunday, March 14, 2010

Like a mini-Thanksgiving...

I had purchased a bone-in turkey breast to roast because I was craving turkey meat for sandwiches...not the pressed-processed junk you find in most deli's but the real thing. However, after spending the day tending to my bed-ridden hubby, I figured we could both do with a "comfort" meal. I decided to roast the turkey and serve with mashed potatoes, gravy and since I had a few leftover green beans, a form of green-bean hot-dish.

Roast Turkey Breast:  Oil the turkey breast with approximately 2 T. olive oil and sprinkle generously with salt and pepper over all sides. Place the breast, skin side up, in a roasting pan and then sliced up 4 T. pats of hard butter, and shove underneath the turkey skin. Covere the breast loosely with foil and baked it at 350-degrees for an hour - at which time you'll want to remove the foil - drain the drippings for the gravy - and return the breast to the oven to finish cooking for approximately 30 minutes. (Meat thermometer should read 161-degrees). When the roast was done I removed it from the oven - recovered it with foil and let it sit for 20 minutes before carving up. During this time the meat will continue to cook and the juices we re-absorb into the meat.

First off, I knew the breast would not render enough drippings for gravy, so I turned to my pantry for one of my favorite stand-by's...Country gravy mix. Instead of following the package directions, I mixed the gravy powder with 1 & 1/2 cups chicken broth and 1/2 cup of the drippings from the turkey breast - brought it to a boil in a small saucepan, then turned the heat to low and stirred constantly until thickened.

I added one small can of green beans to the wee amount of cooked fresh green beans I had from a previous meal. In a medium bowl I combined one can of cream of mushroom soup, 1 T. flour, and 1/4 can milk - stirred to combine and then tossed in the green beans and stirred to mix. Put this mixture in a casserole and baked it at 350-degrees for 30 minutes.

For the French Onion Topping - I didn't have any in the pantry to I decided to make some. I had done this before when we spent Thanksgiving in Australia this past November. As they did not carry such an item in the stores, I made my own. Here is how:   For just the hubby and I, I cut 1/2 sweet onion into slices approximately 1/4" x 1" to 1 1/2" strips. In a quart-size zip-baggy I put a few dashes of Louisiana Hot sauce and 1 c. milk...smooshed together to mix and added the sliced onion. I let them soak for about a half hour before draining. In another quart-size baggy I added 3/4 c. flour with 1 T. each salt and pepper. Into this bag I added the drained onion strips and tossed to coat. Shaking off the excess flour, add the onion to a pan filled with 1" high vegetable oil heated to approximately 350-degrees. Cook in batches if needed - never adding more onion that can cover the bottom of the pan. Remove golden onion bits from the oil with a straining spoon and let drain on paper towel.  Instead of adding these to the top of the casserole while baking - I learned from my experience in Australia that the onions get too well-done - so instead, I waited until I plated up the beans to put the crunchy goodies on top for serving.

Final step was to open a can of cranberry sauce and serve everything up on a tray to my hubby who was delightfully surprised at this unexpected mini-Thanksgiving meal.

Saturday, March 13, 2010

More stretching techniques...

Working with leftovers can be challenging. First of all, if you're like me, you don't look forward to eating the same meal two nights in a row. Secondly, there is often a smidgeon of food left - you hate to throw it out but there's not quite enough for another meal. This is where creativity comes in handy.

For today's dinner I had 1 cup of leftover taco-seasoned shredded beef and 1/4 of an avocado that needed using. (We had taco salads the night before).  So I nuked the shredded beef until it was heated through and stirred in approximately 1 cup pre-shredded Mexican blend cheese. Spread this mixture over one side each of two spinach-flour tortilla wraps - rolled them up,  individually, and heated them in my paninin press until just slightly browned.

I smashed up the leftover quarter of avocado with a pinch of salt and added 1/2 cup sour cream - stirring together until smooth.

Piled some shredded lettuce in the center of the plate. Topped that with the cooked wraps, which I had cut each into thirds. Added a few leftover salad veggies - topped it off with my avocado-sour cream dressing and we had a beautiful dinner that in no way resembled leftovers.

I so love to play with my food!

Wednesday, March 10, 2010

Stretch Your Pasta

Last night we had pasta. It was one of those meals where it is the day before I do my grocery shopping so I make what I call "Garbage Pail Pasta" from whatever leftovers are in the fridge. I call it garbage pail pasta because if it doesn't go in the pasta, it will end up in the garbage pail. Not to mean that we're eating rubbish...just veggies that may be on their last leg (if they had legs). Don't let the name fool you, some of our best pasta meals have been a Garbage Pail Pasta. Last night our larder brought forth spinach, red onion, yellow pepper, zucchini and a bit of goat cheese as well as some Asiago cheese.  I melted the cheeses together with a cup of fat-free half-n-half, plus a half of a jar of marinara for the pasta sauce. 

It was quite good so there wasn't much left. Too much to throw out but not enough for another meal. I tucked it into a zip-loc baggy for lunch the next day...only I never got to it...In fact I got back from the grocery store so late I decided to use the leftover pasta for our dinner. To stretch it out, I added to it a bag of microwavable cauliflour (microwaved on high for 3 minutes), as well as one can of cheddar cheese soup, plus the other half of the jar of marinara sauce I didn't use last night. Stirred it all together and put it into a casserole dish - topped it with a few slices of smoked gouda and baked it at 350-degrees for 25 minutes.


Tip:  Adding cooked cauliflour and a can of cheddar soup to a leftover pasta dish works beautifully - especially for odd shaped pastas (kind of noticible in spaghetti dishes). The cauliflour makes a great "mock pasta" and it lightens up the dish without drastically changing the flavor. Adding the can of undiluted cheddar soup stretches out the sauce and the cheddar flavor compliments most any sauce you add it to. This little trick doubles the amount of food you have on hand. It's a nice trick to have up your sleeve if extra people pop-in on a leftover pasta night.

Monday, March 8, 2010

I'm Baaaccck!!!

Did you miss me? I missed you! Don't you hate it when life gets in the way of living? I won't go into details but I feel as if I'm in the middle of a cyclone where things are calm but chaos is looming around me.

My youngest son suggested I get back into my blogging and I think that is the best advice I've had in a long time.  So here I am. Still "playing with my food" and loving it! I just got back from a trip to the Northwest, and did not have time to get to the store today, so I checked out the contents in my pantry, freezer and fridge to see what I could concoct for dinner tonight.

Working with what is on hand can be challenging, but I find it to be more on the exciting side of challenging than the daunting side. I get a great sense of accomplishment making something out of nothing.

Here is what I came up with tonight:
Individual Tuna Pie for Two

Ingredients:
1, 7 oz. can tuna, drained thoroughly
1 stalk celery, finely chopped
2 T. red onion, finely chopped
3 oz. Jarlsberg cheese, divided
2 Jumbo eggs + 1 egg yolk
1 T. flour
1 c. fat-free 1/2-&-1/2
Salt & Pepper to taste
1 stalk green (spring) onion, chopped finely - divided
1 refrigerated pie crust, bring to room temp.

Preheat oven to 350-degree F.

Instructions:
Spray two individual casserole dishes with non-stick cooking spray.

In a medium bowl combine drained tuna, chopped onion and chopped celery, salt & pepper to taste. Set aside.

Divide pie crust dough in half. Roll each half into a ball and flatten into an approximately 7-inch circles. Place each half into prepared casseroles. Pat together any tears & mold all the way up the sides of each dish.

Divide tuna mixture into quarters and place a quarter of the mixture in the bottom of each casserole. Place one quarter of the grated cheese atop the tuna mixture, repeat with the last two quarters of tuna mixture and grated cheese.

In a medium bowl whisk together both eggs and one yolk. Add 1 T. flour and whisk thoroughly. Pour in the half-n-half and whisk until thoroughly combined. Pour half of mixture over contents of each casserole.

Place casseroles in preheated oven, leaving even distances between each other and the sides of the oven. Meanwhile, spray a sheet of foil with non-stick cooking spray. After cassseroles have baked 30 minutes, loosely lay foil, sprayed side down, atop both casseroles. Continue to bake for another 15 minutes. Remove foil and bake for another 5 minutes or until each casserole is puffed and golden in color.

Remove from oven and let rest for 5 minutes. Top each with fresh cracked pepper and half each of the chopped green onion. Serve and enjoy!

Variations: The type of quiche pies you can make are limited only by your imagination. Keep the egg/cream/flour measurements the same, as well as the amount of cheese, but feel free to change up the ingredients to suit your mood or taste. One of my favorite substitutions is crab in place of the tuna, with diced red pepper in place of the celery. Another is with salmon and capers, replacing the Jarlsburg with crumbled goat cheese. Or for those who aren't fond of seafood, try ham and cheddar cheese, great with chopped asparagus - I like to add 1 T. of Dijon mustard to the egg mixture when using ham. I am serious when I say the possibilities are endless. I have even made these little quiches using leftover pizza that I chopped up and used as the filling! Deeeelissshhhh! Here is a picture of an omelet I made for my hubby using leftover pizza...he loved that I combined two of his favorite foods and thinks a pizza omelet should be a staple on all restaurant menus. Funny guy...it was mighty good eating though!

The "Mark Special" - Pizza Omelet
 
Site Meter